
Rewinding Dead Pickups
Piotr Cieslik sent in this explanation of how to rewind pickup coils yourself instead of having to buy new ones:
The process of identifying bad pickups, unsoldering the wire connecting the pickups and repairing the end of the pickup's coil is described in Steve Woodyard's article. I will focus here on repairing the coil winding start. Seems to be a hard job, but it is not so hard as you may think at first glance. Just a little patience and good intentions needed. Here we go. You have your bad pickup removed from the piano and you are absolutely sure that there is no fracture at the coil winding end (I suggest to use a good magnifying glass). Now check the coil winding start: you may observe some small green oxidation and fracturing. If you are not sure if there is fracturing, you can still do the following repairs (you have nothing to lose).
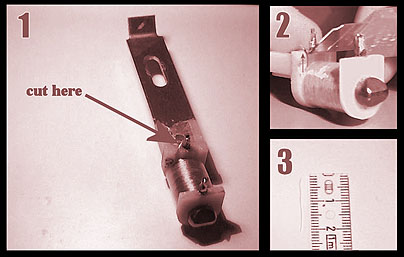
Cut the coil near the post (step 1). The next thing to do is to remove the protecting coating from the coil (step 2). Do it very gently, as the coil is thin like hair and it is easy to break it. Hold your knife perpendicular to the coil (like you were going to cut it) and gently scrape from bottom to top (not the other way!). Now you need an extra piece of coil (step 3), because it is impossible to unwind the coil at its winding start as you would with the coil winding end. I used coil from another pickup, but it could be some similiar thin cord. Your piece should be 2 cm long (about 0.78 inch).
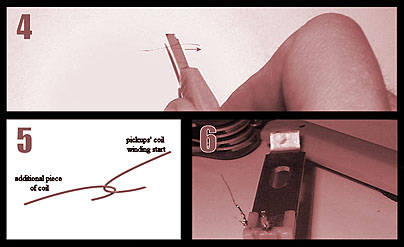
Lay it on a flat surface and again, gently remove the coating (step 4). Then tie your pickup's coil winding start to an additional piece of coil (step 5) as shown in the photo. I found it very helpful for soldering. Do not bend the coil too hard or too many times: it breaks easily. Now you can solder the connection (step 6). Use thin solder (0.1 cm is OK) and lubricate any surface you solder with soldering paste (it helps the solder to attach).

The next thing to do is to wind the remaining end of coil around the post and solder it (step 7). Before you solder, use the soldering paste again. Now you can check your pickup with an ohmmeter: the appropriate reading is about 170-190 ohms. The last thing you may want to do is protect the repaired pickup against another fracture in future. Covering the length of the exposed coil with silicone should do the job. Then you can reinstall your pickup and enjoy it working again. It truly gives you a sense of satisfaction. Good luck!